tech neck stretches

Wicked Good Chiropractic Wellness Group

Since Quarantine became a thing I have noticed more hunching forward posture and neck pain in my office, I have been looking for helpful ways to help you at home:

Ever feel like you’ve been in 1 position too long, & your neck hurts from looking at your computer screen all day??? Too many at-home meetings…too many texts, and the list goes on.

So, here’s more yoga type “at home” stretches you & your family can do to help reduce neck pain:

I can’t take the credit here, I found this while hunting on Pinterest for ideas for anything, something to eat, something to do, some new work out routine…we’ve all been in the house so long! Heres the link to the original article: https://blog.paleohacks.com/yoga-poses-tech-neck-pain/#

So here’s an overview:

#1  Tech Neck Cat Cow

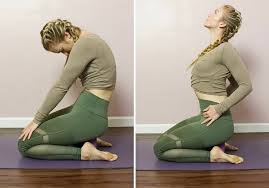
This variation of the traditional cat cow sequence will help to realign your neck, reset your shoulders, and relieve pain caused by looking down at your screen.

  1. Kneel down on your mat and put a block or small pillow between your feet. Sit your hips back on the block or pillow. Place your palms face down on your knees.
  2. Exhale to lean back against your palms and tilt your chin down towards your chest, rounding your spine.
  3. Inhale to lift your chin and chest. Slide your hands back into your hip creases and point your elbows straight back, squeezing your shoulder blades together. Then lift your chin and chest up towards the sky.
  4. Continue alternating postures for eight rounds of breath.
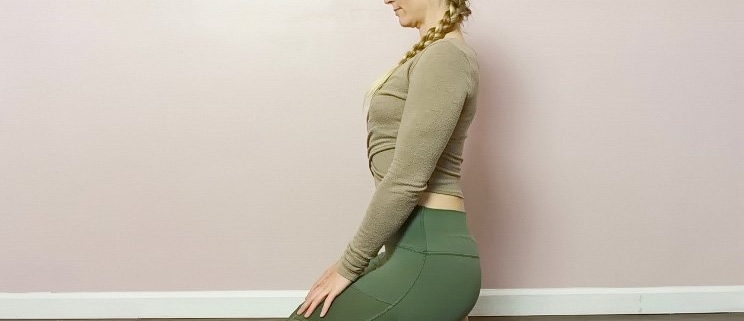
 

#2 Jalandhara Banha

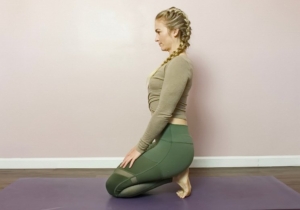
Use this simple yoga pose to help realign your cervical spine, preventing a hunched over back.

  1. Begin kneeling on your mat with your toes tucked under and your hips on your heels. You can also sit on a block. Place your palms face down on your knees.
  2. Tilt your chin down slightly and lift your chest up slightly. Squeeze your shoulder blades together.
  3. Then, pull your chin back towards your throat. You should feel a lengthening in the back of your neck as your cervical spine comes back over the thoracic spine. Hold for five deep breaths.

#3 Bound Forward Fold

Straighten up your chest and shoulders with this forward pose.

  1. Stand with your feet hip-width distance apart. Interlace your fingers behind your lower back and squeeze your shoulder blades together. Make sure that there is a tiny bend in the elbows.
  2. Inhale to puff up your chest, then exhale as you bend deeply into the knees and fold forward.
  3. Rest your torso on your thighs and allow your hands to come off of your lower back as much as they can without forcing it. Hold for five breaths, then slowly stand back up on an inhale to release.
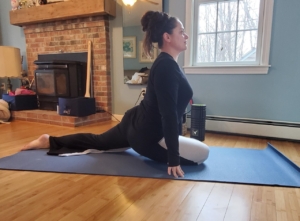
#4 Baby Cobra

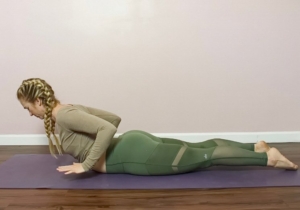
Straighten out your posture by strengthening your back and rear delts with this heart-opening pose.

  1. Lie face down on your mat with your legs straight back behind you. Bend your elbows and place your palms on the mat next to your ribs. Your elbows should be stacked over your wrists.
  2. Press your feet down as you inhale and lift your head, chest, and palms off the mat. You should feel the muscles that run along the spine strengthening.
  3. Hold for five deep breaths, then gently release.

#5 Camel

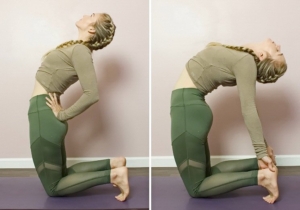
Take the hunch out of your back with this chest and throat opening yoga move.

  1. Kneel down on the mat with your knees hip-width distance apart. Place your palms on your lower back with your fingers pointing up and squeeze your shoulder blades together.
  2. Inhale to lift your chest up and back to come into a backbend. Make sure that you are lifting out of your lower back the entire time.
  3. You can keep your hands on your lower back or to go deeper, place your hands on your heels. Once you are in your full expression, tilt the chin up and back to open the throat. Keep the neck nice and long the entire time. Hold for five breaths.

#6 Downward Facing Dog

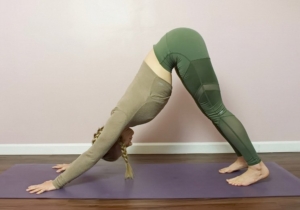
Realign and lengthen the spine with this classic yoga pose.

  1. Start in a tabletop position with your shoulders stacked over your wrists. Spread your fingers wide and roll your shoulders outward so that the pointy part of your elbows point back towards your feet.
  2. Keep the arms engaged as you tuck your toes and lift your hips up towards the sky to come into your downward facing dog.
  3. Bend your knees as much as you need to for your spine to be straight. Drop your head and press your chest up and back towards your upper thighs.
  4. Hold for eight breaths.
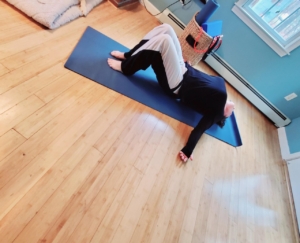
#7 Shoulder Pigeon

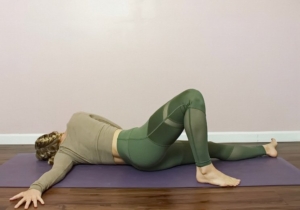
Ease into this chest opener to reverse your slouchy posture.

  1. Lay down on your belly.
  2. Place your left palm under your left shoulder and extend your right arm straight out to the side with the palm face down.
  3. Bend your left knee and press through your left palm to roll onto your right shoulder. Place your left foot on the floor outside of your right leg.
  4. Close your eyes and breathe deeply for eight breaths, then switch sides.
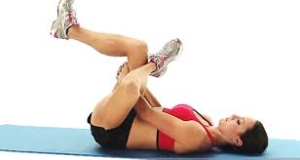
#8 Sage’s Twist

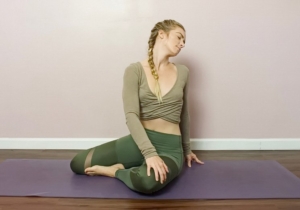
This pose releases neck tension and mobilizes the spine.

  1. Sit on the floor with your legs straight out in front of you.
  2. Bend your right knee back towards your right glute so that the shin and top of the foot are on the floor. Then, bend your left knee and bring the sole of the left foot to the inner right thigh.
  3. Tent your left fingers behind your left hip and reach your right arm straight overhead. Inhale, then exhale to twist your torso to the left, placing your right palm on the outer left thigh.
  4. Lower your left ear towards your left shoulder to feel a stretch in the front right side of your neck.
  5. Hold for eight deep breaths, then switch sides.

#9 Supported Fish

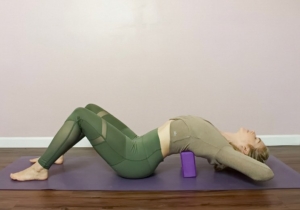
This heavenly restorative pose will reverse the effects of tech neck and poor posture.

  1. Sit on your mat with your knees bent and your feet on the floor. Place a pillow or a block on the low or medium height behind you.
  2. Use your hands to lower your back onto the block so that it rests comfortably on your upper back. Your hips should stay on the ground the entire time.
  3. Interlace your fingers behind your head and lean your head back into your palms. Open your elbows out wide. Hold for eight slow breaths.

Have fun, Take your time. As I tell my patients do what you can as you can with stretches & keep working at it & you will be able to perform them soon without pain & completely, and you will feel better for it.  -WickedDrSarah

working from home

Seriously, Is this really happening?

As a chiropractor I have been deemed an essential service, after years in the background I am happy to have this status! I am happy to be here for you – the #workathomers because –

when I decided the safety of my employees was a top priority – during the short time we closed for the initial “15 days to slow the spread” as recommended by the US government I couldn’t stop thinking about YOU.

How is everyone handling the work at home ergonomics? Were you thinking that I wasn’t there for you while you are having back pain from sitting at your kitchen table or on your couch? Should I just suck it up & get back in there?  As The Pats would say: Do your job?

YES!

So we re-opened and I am glad I did- You did need me! 99.9% of my clients I saw in the office this week were glad I was open, they were having muscle & back, neck pain complaints from sitting and working at home. I felt better, you feel better – Isn’t that why we are here – to help one another in any way we can?

At Wicked Good Chiro, I always wanted my office to feel like your third place (more on that later) & I did that & you are welcome in my office anytime.

I worked at Starbucks for years, I love coffee – That is another story! Starbucks trained us to have excellent customer service, as you are only as good as your customers are willing to come through your door. It is those customers that you want to feel comfortable, as comfortable in the coffee shop as they do at home, as they do at work – and for most of you, that place is now the same!

Even if you just want to be out of your other “comfortable places”, come on in – say HI, get an adjustment and feel normal for a few minutes – because you are welcome here at Wicked Good.

This was the week for stretch requests: What can I do at home to help questions.

So here it is

For those of you that need extra care at home, here are 5 stretches to do after your endless sitting marathons, Zoom meetings & becoming a homeschool expert

#1 Your Chest Muscles

Why you need to stretch them: “We tend to lean forward or slouch when we sit, which creates issues even down to your lower back. When that happens your chest muscles remaining tight can lead to postural problems and shoulder pain. So stretch!

How to: The best way to stretch or open your pecs is to perform movement patterns that pull your shoulders back. You can do this with foam rolling, stretches, or strengthening exercises, but her number one exercise for this is a reverse fly. “It strengthens your back and stretches your pecs. If your back muscles are weak, you will have a greater tendency for tight pecs. So usually solving flexibility problems is best complemented by also strengthening the opposing muscle.

I recommend a 2 move stretch/strengthen to accomplish this:
Stretch on your foam roller first – If you can’t tell what I’m doing in this pic ( I recruited my mini-me to help take pics)  – my foam roller is ALONG or with my spine, and I am stretching my head, arms & lower spine.

Then do Reverse Flys to strengthen –

Start standing with feet shoulder-width apart and dumbbells in hand. Hinge at the hips so that back is nearly parallel to floor and micro-bend knees. Let the dumbbells hang straight down, palms facing each other. Keeping back flat and torso still, engage back muscles to lift arms straight out to sides until they’re in line with shoulders. Your upper body will form a “T.” Return to starting position then repeat for 3 sets of 12 reps.

To stretch, cross your arms in front of your body, then pull your arms back behind you as far as possible. At the end point, hold for 15-30 seconds then repeat. You should feel a stretch in your pecs, along with contraction of your back muscles.

# 2 Your Hip Flexors

Why you need to stretch them: When you sit, your hips are flexed—and when your hips are flexed, the muscles of the hips shorten. And if your hips are placed in a shortened position for an extended period of time—and you don’t do exercise to extend the muscle back to a normal length—this then pulls on your back & hips which can lead to limited movement and lower back pain.

How to: A simple lunge is will work because it opens the hips and stretches the associated muscles.
Stand tall (holding dumbbells in each hand at sides is optional). Take a big step forward with right leg and lower body until the right thigh is parallel to floor and right shin is vertical. Make sure your the alignment of the front knee is directly above your ankle, and your other knee doesn’t touch the floor. Keep the weight in your heels. Press into the right heel to drive back up to starting position. Continue on your right leg for 8 to 12 reps then repeat on opposite leg. That’s one set. Complete 3 sets.

Special note: My other FAVE hip flexor Stretch is to lay on my back and place a yoga block under my tail bone and stretch out flat

# 3 Your Spine Muscles

Why you need to stretch them: When you’re slouching, it puts extra stress on your mid to lower back fascia and the muscles supporting your spine.  If these muscles don’t have enough strength and/or endurance, the demands of sitting (or holding your core up) become too much and you’re setting yourself up for pain.

How to open them up: Opening your hip flexors is key—they cross multiple joints, including your entire lumbar spine. These exercises can help: Planks and push-up

Start at the top of a push-up position, shoulders directly over wrists. Draw shoulders down and back and engage abdominal muscles tight to keep hips in line with shoulders so your body forms a long, straight line. Squeeze legs and glutes for support and hold this position for 45 to 60 seconds, or lower chest to hover above floor before pushing back up to start.

# 4 Your Piriformis

Why you need to stretch it: Your piriformis is an essential muscle located deep in the butt, behind your glutes. Sitting changes your pelvis in a way that doesn’t allow your glutes to work when you run or walk.  So what?? Your piriformis has to take over. If that muscle gets too tight, it can shorten and put pressure on your sciatic nerve & that causes pain.

How to open them up: The best way to do this depends on your level of flexibility. Pigeon stretch feels great to some people, others might prefer to lay on their back and do figure four legs. A standing version can be easily adjusted to your flexibility level.


Ok, its obvious I need to stretch more, lol
Not to self – Do more yoga with Tabitha Rose! you can find her on FB: Tabitha Rose-Connect With Fitness

From a downward dog position, draw right knee to chest, then lie right shin on floor so that shin is parallel to top edge of mat as you lower down to mat with left leg behind you. Then lean forward if possible. Hold for 30 seconds. Repeat on other side.

If this is too hard – try a figure four pose!

#5 Your FEET

Why you need to stretch it: Your plantar fascia is the connective tissue that runs from your heel to the base of your toes. When you sit all day, it can cause them to become tight. When we stand up or go for a run following a full day of sitting, these tight muscles tug on our bones leading to inflammation and painful bone spurs & lead to plantar fascitis.

How to open it up: Rolling your feet over foot rollers or pointing and flexing your foot against resistance bands are the best ways to stretch these foot tissues and muscles. A targeted plantar fascia stretch can also open up the connective tissue. Try a stretch on your stairs.

image  

Sit down, and place the foot across your knee. Using your hand on the same side, pull your toes back toward your shin until you feel a stretch in your arch. Run your thumb along your foot—you should feel tension. Hold for 10 seconds.

Or use your stairs! place reminders on a few stairs & do it every time you go up! Remember to do both feet!

GOOD LUCK & STAY HEALTHY!

Stay tuned for more Wicked Good Blog posts coming soon! -Dr. Sarah
Or visit us: www.wickedgoodchiro.com