Weight loss women with tape

As the blossoms of spring signal a time of renewal, it’s the perfect moment to embark on a transformative wellness journey with ChiroTHIN. Our dedicated nutrition team, comprising the dynamic duo Rebecca and Dani, is ready to guide you towards sustainable weight management and overall health.

Rebecca and Dani are passionate about empowering individuals like you to make positive and lasting changes to your lifestyle. By scheduling a personalized meeting with them, you open the door to a wealth of nutritional expertise tailored to your unique needs and goals. This isn’t just about shedding pounds; it’s about cultivating a healthier, more vibrant you.

Why meet with Rebecca and Dani? Their combined knowledge and experience create a dynamic synergy, ensuring that your nutrition plan aligns seamlessly with your aspirations. They are not just here to provide guidance; they’re here to be your partners in this transformative journey. Imagine having a team dedicated to crafting a plan that not only helps you achieve your weight management goals but also fosters long-term well-being.

Why lose weight? Top 3 reasons to lose those extra pounds

  1. Heart Health: Shedding excess weight significantly reduces the strain on your heart and lowers the risk of cardiovascular diseases. Carrying extra pounds can lead to high blood pressure, elevated cholesterol levels, and an increased likelihood of developing conditions such as heart disease and stroke. Losing weight through a combination of healthy eating and regular physical activity supports a stronger, more efficient cardiovascular system, promoting overall heart health and reducing the risk of life-threatening complications.
  2. Type 2 Diabetes Prevention and Management: Weight loss plays a crucial role in preventing the onset of type 2 diabetes and managing the condition for those already diagnosed. Excess body weight is a major risk factor for insulin resistance, a precursor to diabetes. By achieving and maintaining a healthy weight, individuals can enhance their body’s ability to regulate blood sugar levels, potentially preventing the development of type 2 diabetes or better managing the condition for those already affected. Lifestyle changes, including weight loss, are often recommended as part of diabetes prevention and management plans.
  3. Improved Joint Health and Mobility: Carrying excess weight puts additional stress on the joints, particularly those in the knees, hips, and lower back. This increased strain can lead to conditions such as osteoarthritis, causing pain, inflammation, and reduced mobility. Weight loss can alleviate this burden on the joints, providing relief and preventing further deterioration. By achieving a healthier weight, individuals can experience improved joint function, reduced pain, and increased mobility, contributing to a better quality of life and the ability to engage in more physical activities.

Spring is the season of growth, and what better time to cultivate positive change in your life? Schedule a meeting with Rebecca and Dani to dive into the benefits of ChiroTHIN. Discover a personalized approach to nutrition that embraces the abundance of fresh, seasonal foods, and set the stage for a healthier, more energetic future.

Don’t miss out on this opportunity to revitalize your health and well-being. Call now 508.339.1418 to schedule your meeting with Rebecca and Dani, and take that exciting first step towards a spring filled with renewed vitality and a transformed you. Your journey to wellness begins with a conversation – let Rebecca and Dani be your guides!

tech neck stretches

Wicked Good Chiropractic Wellness Group

Since Quarantine became a thing I have noticed more hunching forward posture and neck pain in my office, I have been looking for helpful ways to help you at home:

Ever feel like you’ve been in 1 position too long, & your neck hurts from looking at your computer screen all day??? Too many at-home meetings…too many texts, and the list goes on.

So, here’s more yoga type “at home” stretches you & your family can do to help reduce neck pain:

I can’t take the credit here, I found this while hunting on Pinterest for ideas for anything, something to eat, something to do, some new work out routine…we’ve all been in the house so long! Heres the link to the original article: https://blog.paleohacks.com/yoga-poses-tech-neck-pain/#

So here’s an overview:

#1  Tech Neck Cat Cow

This variation of the traditional cat cow sequence will help to realign your neck, reset your shoulders, and relieve pain caused by looking down at your screen.

  1. Kneel down on your mat and put a block or small pillow between your feet. Sit your hips back on the block or pillow. Place your palms face down on your knees.
  2. Exhale to lean back against your palms and tilt your chin down towards your chest, rounding your spine.
  3. Inhale to lift your chin and chest. Slide your hands back into your hip creases and point your elbows straight back, squeezing your shoulder blades together. Then lift your chin and chest up towards the sky.
  4. Continue alternating postures for eight rounds of breath.


#2 Jalandhara Banha

Use this simple yoga pose to help realign your cervical spine, preventing a hunched over back.

  1. Begin kneeling on your mat with your toes tucked under and your hips on your heels. You can also sit on a block. Place your palms face down on your knees.
  2. Tilt your chin down slightly and lift your chest up slightly. Squeeze your shoulder blades together.
  3. Then, pull your chin back towards your throat. You should feel a lengthening in the back of your neck as your cervical spine comes back over the thoracic spine. Hold for five deep breaths.

#3 Bound Forward Fold

Straighten up your chest and shoulders with this forward pose.

  1. Stand with your feet hip-width distance apart. Interlace your fingers behind your lower back and squeeze your shoulder blades together. Make sure that there is a tiny bend in the elbows.
  2. Inhale to puff up your chest, then exhale as you bend deeply into the knees and fold forward.
  3. Rest your torso on your thighs and allow your hands to come off of your lower back as much as they can without forcing it. Hold for five breaths, then slowly stand back up on an inhale to release.

#4 Baby Cobra

Straighten out your posture by strengthening your back and rear delts with this heart-opening pose.

  1. Lie face down on your mat with your legs straight back behind you. Bend your elbows and place your palms on the mat next to your ribs. Your elbows should be stacked over your wrists.
  2. Press your feet down as you inhale and lift your head, chest, and palms off the mat. You should feel the muscles that run along the spine strengthening.
  3. Hold for five deep breaths, then gently release.

#5 Camel

Take the hunch out of your back with this chest and throat opening yoga move.

  1. Kneel down on the mat with your knees hip-width distance apart. Place your palms on your lower back with your fingers pointing up and squeeze your shoulder blades together.
  2. Inhale to lift your chest up and back to come into a backbend. Make sure that you are lifting out of your lower back the entire time.
  3. You can keep your hands on your lower back or to go deeper, place your hands on your heels. Once you are in your full expression, tilt the chin up and back to open the throat. Keep the neck nice and long the entire time. Hold for five breaths.

#6 Downward Facing Dog

Realign and lengthen the spine with this classic yoga pose.

  1. Start in a tabletop position with your shoulders stacked over your wrists. Spread your fingers wide and roll your shoulders outward so that the pointy part of your elbows point back towards your feet.
  2. Keep the arms engaged as you tuck your toes and lift your hips up towards the sky to come into your downward facing dog.
  3. Bend your knees as much as you need to for your spine to be straight. Drop your head and press your chest up and back towards your upper thighs.
  4. Hold for eight breaths.

#7 Shoulder Pigeon

Ease into this chest opener to reverse your slouchy posture.

  1. Lay down on your belly.
  2. Place your left palm under your left shoulder and extend your right arm straight out to the side with the palm face down.
  3. Bend your left knee and press through your left palm to roll onto your right shoulder. Place your left foot on the floor outside of your right leg.
  4. Close your eyes and breathe deeply for eight breaths, then switch sides.

#8 Sage’s Twist

This pose releases neck tension and mobilizes the spine.

  1. Sit on the floor with your legs straight out in front of you.
  2. Bend your right knee back towards your right glute so that the shin and top of the foot are on the floor. Then, bend your left knee and bring the sole of the left foot to the inner right thigh.
  3. Tent your left fingers behind your left hip and reach your right arm straight overhead. Inhale, then exhale to twist your torso to the left, placing your right palm on the outer left thigh.
  4. Lower your left ear towards your left shoulder to feel a stretch in the front right side of your neck.
  5. Hold for eight deep breaths, then switch sides.

#9 Supported Fish

This heavenly restorative pose will reverse the effects of tech neck and poor posture.

  1. Sit on your mat with your knees bent and your feet on the floor. Place a pillow or a block on the low or medium height behind you.
  2. Use your hands to lower your back onto the block so that it rests comfortably on your upper back. Your hips should stay on the ground the entire time.
  3. Interlace your fingers behind your head and lean your head back into your palms. Open your elbows out wide. Hold for eight slow breaths.

Have fun, Take your time. As I tell my patients do what you can as you can with stretches & keep working at it & you will be able to perform them soon without pain & completely, and you will feel better for it.  -WickedDrSarah

working from home

Seriously, Is this really happening?

As a chiropractor I have been deemed an essential service, after years in the background I am happy to have this status! I am happy to be here for you – the #workathomers because –

when I decided the safety of my employees was a top priority – during the short time we closed for the initial “15 days to slow the spread” as recommended by the US government I couldn’t stop thinking about YOU.

How is everyone handling the work at home ergonomics? Were you thinking that I wasn’t there for you while you are having back pain from sitting at your kitchen table or on your couch? Should I just suck it up & get back in there?  As The Pats would say: Do your job?

YES!

So we re-opened and I am glad I did- You did need me! 99.9% of my clients I saw in the office this week were glad I was open, they were having muscle & back, neck pain complaints from sitting and working at home. I felt better, you feel better – Isn’t that why we are here – to help one another in any way we can?

At Wicked Good Chiro, I always wanted my office to feel like your third place (more on that later) & I did that & you are welcome in my office anytime.

I worked at Starbucks for years, I love coffee – That is another story! Starbucks trained us to have excellent customer service, as you are only as good as your customers are willing to come through your door. It is those customers that you want to feel comfortable, as comfortable in the coffee shop as they do at home, as they do at work – and for most of you, that place is now the same!

Even if you just want to be out of your other “comfortable places”, come on in – say HI, get an adjustment and feel normal for a few minutes – because you are welcome here at Wicked Good.

This was the week for stretch requests: What can I do at home to help questions.

So here it is

For those of you that need extra care at home, here are 5 stretches to do after your endless sitting marathons, Zoom meetings & becoming a homeschool expert

#1 Your Chest Muscles

Why you need to stretch them: “We tend to lean forward or slouch when we sit, which creates issues even down to your lower back. When that happens your chest muscles remaining tight can lead to postural problems and shoulder pain. So stretch!

How to: The best way to stretch or open your pecs is to perform movement patterns that pull your shoulders back. You can do this with foam rolling, stretches, or strengthening exercises, but her number one exercise for this is a reverse fly. “It strengthens your back and stretches your pecs. If your back muscles are weak, you will have a greater tendency for tight pecs. So usually solving flexibility problems is best complemented by also strengthening the opposing muscle.

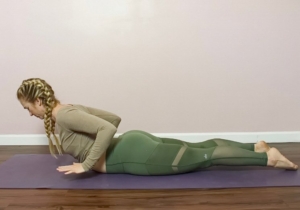
I recommend a 2 move stretch/strengthen to accomplish this:
Stretch on your foam roller first – If you can’t tell what I’m doing in this pic ( I recruited my mini-me to help take pics)  – my foam roller is ALONG or with my spine, and I am stretching my head, arms & lower spine.

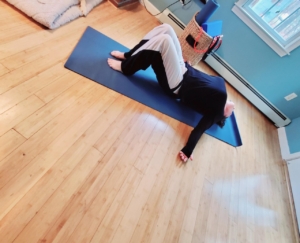
Then do Reverse Flys to strengthen –

Start standing with feet shoulder-width apart and dumbbells in hand. Hinge at the hips so that back is nearly parallel to floor and micro-bend knees. Let the dumbbells hang straight down, palms facing each other. Keeping back flat and torso still, engage back muscles to lift arms straight out to sides until they’re in line with shoulders. Your upper body will form a “T.” Return to starting position then repeat for 3 sets of 12 reps.

To stretch, cross your arms in front of your body, then pull your arms back behind you as far as possible. At the end point, hold for 15-30 seconds then repeat. You should feel a stretch in your pecs, along with contraction of your back muscles.
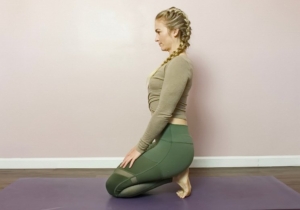
# 2 Your Hip Flexors

Why you need to stretch them: When you sit, your hips are flexed—and when your hips are flexed, the muscles of the hips shorten. And if your hips are placed in a shortened position for an extended period of time—and you don’t do exercise to extend the muscle back to a normal length—this then pulls on your back & hips which can lead to limited movement and lower back pain.

How to: A simple lunge is will work because it opens the hips and stretches the associated muscles.
Stand tall (holding dumbbells in each hand at sides is optional). Take a big step forward with right leg and lower body until the right thigh is parallel to floor and right shin is vertical. Make sure your the alignment of the front knee is directly above your ankle, and your other knee doesn’t touch the floor. Keep the weight in your heels. Press into the right heel to drive back up to starting position. Continue on your right leg for 8 to 12 reps then repeat on opposite leg. That’s one set. Complete 3 sets.

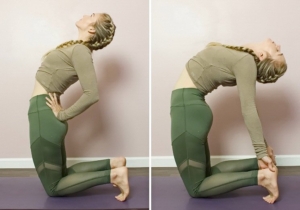
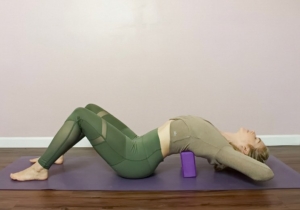
Special note: My other FAVE hip flexor Stretch is to lay on my back and place a yoga block under my tail bone and stretch out flat

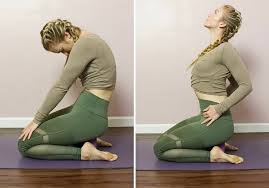
# 3 Your Spine Muscles

Why you need to stretch them: When you’re slouching, it puts extra stress on your mid to lower back fascia and the muscles supporting your spine.  If these muscles don’t have enough strength and/or endurance, the demands of sitting (or holding your core up) become too much and you’re setting yourself up for pain.

How to open them up: Opening your hip flexors is key—they cross multiple joints, including your entire lumbar spine. These exercises can help: Planks and push-up

Start at the top of a push-up position, shoulders directly over wrists. Draw shoulders down and back and engage abdominal muscles tight to keep hips in line with shoulders so your body forms a long, straight line. Squeeze legs and glutes for support and hold this position for 45 to 60 seconds, or lower chest to hover above floor before pushing back up to start.
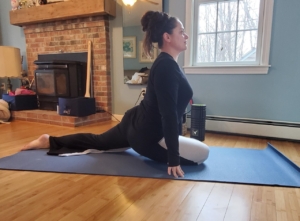
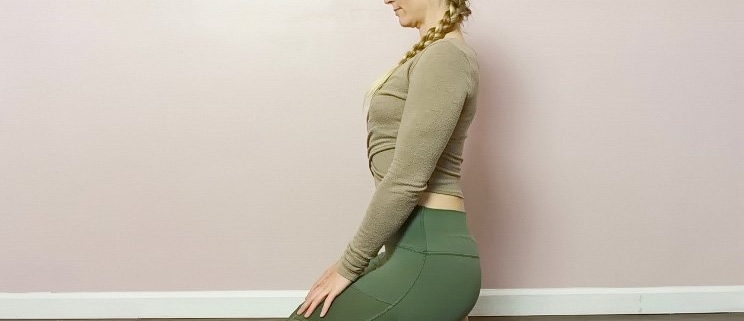
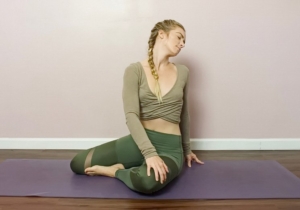
# 4 Your Piriformis

Why you need to stretch it: Your piriformis is an essential muscle located deep in the butt, behind your glutes. Sitting changes your pelvis in a way that doesn’t allow your glutes to work when you run or walk.  So what?? Your piriformis has to take over. If that muscle gets too tight, it can shorten and put pressure on your sciatic nerve & that causes pain.

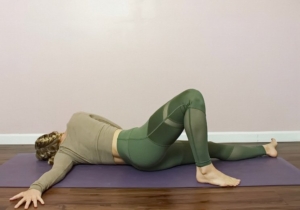
How to open them up: The best way to do this depends on your level of flexibility. Pigeon stretch feels great to some people, others might prefer to lay on their back and do figure four legs. A standing version can be easily adjusted to your flexibility level.


Ok, its obvious I need to stretch more, lol
Not to self – Do more yoga with Tabitha Rose! you can find her on FB: Tabitha Rose-Connect With Fitness

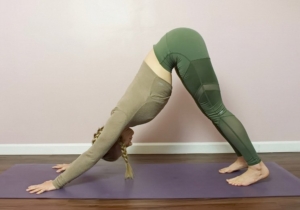
From a downward dog position, draw right knee to chest, then lie right shin on floor so that shin is parallel to top edge of mat as you lower down to mat with left leg behind you. Then lean forward if possible. Hold for 30 seconds. Repeat on other side.

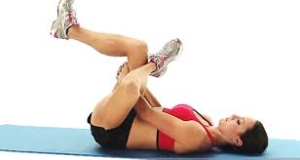
If this is too hard – try a figure four pose!
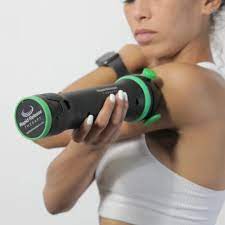
#5 Your FEET

Why you need to stretch it: Your plantar fascia is the connective tissue that runs from your heel to the base of your toes. When you sit all day, it can cause them to become tight. When we stand up or go for a run following a full day of sitting, these tight muscles tug on our bones leading to inflammation and painful bone spurs & lead to plantar fascitis.

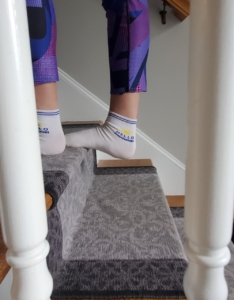
How to open it up: Rolling your feet over foot rollers or pointing and flexing your foot against resistance bands are the best ways to stretch these foot tissues and muscles. A targeted plantar fascia stretch can also open up the connective tissue. Try a stretch on your stairs.

image  

Sit down, and place the foot across your knee. Using your hand on the same side, pull your toes back toward your shin until you feel a stretch in your arch. Run your thumb along your foot—you should feel tension. Hold for 10 seconds.

Or use your stairs! place reminders on a few stairs & do it every time you go up! Remember to do both feet!

GOOD LUCK & STAY HEALTHY!

Stay tuned for more Wicked Good Blog posts coming soon! -Dr. Sarah
Or visit us: www.wickedgoodchiro.com

morning stretches

4 Stretches to Do First Thing in the Morning 

When most people wake up, they hit the ground running. Whether it’s making breakfast or checking your emails, it can (and should) wait. Before you ever leave your bed, there are a few stretches you should be doing each morning to help prevent pain throughout the day.


1. Low Back Stretch

Lie on your back and bring your knees to your chest. Pull both knees down toward your chest, relax, and hold for about 30 seconds.


2. Glut Stretch

Lie on your back with your knees bent, then cross your left leg over your right leg. Use both hands to pull your right knee toward your chest. You should feel a stretch across your left buttocks. Hold for about 30 seconds and then repeat on the opposite side.


3. Pelvic Tilt

Lie on your back with your knees bent. The small of your back should not be touching the bed. Tighten your abdomen so that the small of your back presses flat against your bed. Hold this positions for five seconds, then release. Repeat this at least three times.


4. Piriformis Stretch

Lie on your back with your right leg crossed over your left leg. Gently pull your right knee toward your chest until you feel a stretch in your buttocks. Hold for 30 seconds. Release and repeat 3 times. Then do the same on the opposite side.


Receive Regular Chiropractic Adjustments

In addition to these stretches, you should also be coming in for regular chiropractic care to get your spine checked. So don’t forget to schedule and adjustment soon!


Wicked Good Life

Wicked Good News – We are hoping to start video and blog posts towards our new #wickedgoodlife series, as a spin off of our Wicked Good Chiro & Wicked Good Lifestyle Facebook & Instagram pages.
It will be full of great ideas on how to live healthier, fun facts about all of our services; like Chiropractic, Acupuncture, Eating healthy, Weight loss, Massage, Detoxification, Exercise, Infrared sauna, weekend survival tips, fun fitness ideas and so much more. I will host mini-interviews with some of my favorite experts. We are bombarded by so much information and if you ever “googled” something on health or weight loss, the pop-up ads will be everywhere you look so, I will discuss the latest in health trends, research, important things you should know & how to make sense of it all. You might even get a few fun moments from the way we lead our wickedgoodlife.  My goals have always been to treat my clients in a way to allow them to live pain free & so they can get out there & live their wicked good life.

We are open to wicked good ideas on subjects you want more information on or answering any questions you have about being healthy.  Stay tuned for more details.

Wicked Good has Good Vibrations…

Find out more about Rapid Release Therapy & how it can help you

Published on Apr 22, 2016
http://RapidResultsRelief.com Rapid Release Technology (RRT) is a safe, fast, cost-effective way to treat pain. Rapid Release Technology (RRT) uses Targeted High-Speed Vibration to penetrate deep into tissue. RRT sessions take just a few minutes, are comfortable and non-intrusive with lasting results. Many of our patients respond within a few sessions.

Rapid Release is the only device that targets scar tissue via resonance frequency.

Only Rapid Release elicits the Tonic Vibration Reflex instantly releasing spasms.

Rapid Release floats and separates the fascia, allowing ease of movement.

Increases blood flow, reducing hypoxia and releasing tension.

The Problem:

Scar Tissue forms in the body as a temporary patching mechanism for wounds caused by injury, surgery, trauma or repetitive stress. This scar tissue dries out and contracts over time creating tension, stiffness and hypersensitivity.

Adhesions can form and fasten two or more layers of tissues not normally connected, just like a spot weld fastens two pieces of metal together. Adhesions also increase tension and stiffness in your body.

Fascia Restrictions: Think of fascia as a shrink wrap that surrounds every muscle in your body. If this becomes dried out, it loses elasticity leading to more tension and stiffness.

Circulation. Cells need nutrients and oxygen to function properly. Without ample oxygen, a certain percentage of your muscle cells never fully release after you use them. Tight muscles restrict blood flow creating more tension. Many problems of the musculoskeletal system are related to muscle shortening (Lewit 1999)

Fluid restrictions can cause swelling, congestion, toxic buildup and restrict movement.

Trigger Points are hyperirritable spots in the fascia surrounding skeletal muscle also known as knots.

https://www.youtube.com/watch?v=hGbna…

bio freeze gel

* Wicked Good is an authorized Biofreeze re-seller. Biofreeze can only be sold at healthcare professionals and facilities.

New formula Biofreeze offers even greater pain relief

Biofreeze has long been the #1 clinically used and recommended topical analgesic.  Now, though, it is even better. The enhanced formula is:

  • more natural than ever (uses no waxes, oils or petroleum),
  • 100% paraben-free, and available in both green and colorless versions.
  • Just like the old Biofreeze, the new version has no greasy feel or odor and won’t stain your clothes.

Is the change in Biofreeze really an improvement?

The manufacturer of Biofreeze was very cautious about changing the best-selling Biofreeze formulation.  Nothing was left to chance.
Development of the new formula involved more than two years of testing and refinement.  Finally, an extensive study validated the change:  4 out of 5 users preferred the new Biofreeze Pain Reliever.  It is an improvement.
If you are looking for fast-acting, penetrating, long-lasting pain relief, Biofreeze delivers.
Part of the reason is ilex, an herbal extract from a South American holly shrub.  Used traditionally by Paraguayan Indians to enhance the effectiveness of their medicines, today ilex is incorporated into various preparations worldwide to enhance health and wellness.
Who can benefit from Biofreeze?

The new Biofreeze with ilex helps provide quick and penetrating relief from:

  • arthritis pain,
  • back pain,
  • neck, hip and leg pain,
  • painful joints,
  • ankle or foot pain,
  • sports injuries,
  • muscle soreness or strain, or
  • shoulder and arm discomfort.

Biofreeze works for both acute and chronic pain.

How does Biofreeze help with acute pain?

For almost 20 years, patients and clinicians have relied on Biofreeze’s cryotherapy effects to manage the pain of bodily sprains and strains.  A recent study reported in theClinical Journal of Sports Medicine concluded that Biofreeze and ice both have the same effect in reducing blood flow.  Applied following an acute injury or after strenuous activity, they lower the metabolic demand on injured tissues and help reduce pain.
Biofreeze is used by health care professionals worldwide to aid in physical rehabilitation.  Pre-treating acute areas of muscle spasm, for instance, allows those muscles to relax more quickly, improving treatment response. By facilitating relaxation, Biofreeze aids in ultrasound treatments, massage, and rehab on many areas of the body.

In a similar way, many athletes rely on Biofreeze, using it before and after workouts to help relieve pain. Some will put a packet of Biofreeze into a dixie cup with water and freeze it to use as an ice massage.  Studies suggest that  combining Biofreeze with ice application accomplishes a greater reduction in blood flow (40%) than either used alone (26% to 28%).
Folks in general also turn to Biofreeze to help with sore muscles and general aches and pains. They find it lessens discomfort and helps restore strength, enabling a quicker return to daily activities. Interestingly, a study found that when Biofreeze gel was applied to one leg, blood flow was also reduced on the opposite leg, suggesting Biofreeze’s action has a systemic effect.  This is significant, since pain is regulated by the central nervous system.

Why use Biofreeze for chronic pain?

As valuable as Biofreeze is to those with acute pain, it may be doubly so for those who struggle with pain on a day in, day out basis.
Individuals with arthritis (and there are some 23 million of them in the USA alone) are among those who live with pain.  Because there are currently no cures for arthritis, sufferers seek ways to keep their pain manageable.  Often this means pain killers, with their potent side effects.  To these individuals Biofreeze offers an invaluable alternative, an approach to easing pain that is topical and without the complications that accompany oral pain killers.
What features does this new Biofreeze have?

The new Biofreeze is a unique, effective pain reliever formulated to provide a variety of benefits for therapy, pain relief, exercise/training and overall comfort.  It features:

  • easy application
  • quick penetration
  • enhanced and more natural formula
  • dye-free (colorless) option
  • 100% paraben-free
  • proprietary herbal blend
  • effective skin conditioners
  • greaseless and non-staining, with vanishing scent

Biofreeze pain reliever was developed without animal testing.  It is manufactured in the USA.
Biofreeze comes in gel, spray, roll-on and single-use applications.  Combine Biofreeze with Therabands for effective rehab following injury.

heart health

By Christina DeBusk|

healthy heartThe Centers for Disease Control and Prevention (CDC) reports that one out of every three adults in the United States, roughly 70 million people in total, currently has issues with high blood pressure.

While this statistic is scary enough, they go on to say that only a little over half (52 percent to be exact), have this potentially life-threatening condition under control. This may be contributing to the estimated 1,000 people a day dying of heart related conditions.
While there are some organs a person can live without such as your gall bladder and even one of your kidneys, the heart is one organ that is absolutely necessary in order to survive. That makes taking care of it and nurturing its health not only critical to having a long, healthy life, but to having a life — period. One way to help your patients do that naturally is with the help of chiropractic care.

Chiropractic for lower blood pressure

Many studies have found that regular chiropractic visits can help lower blood pressure, sometimes the equivalent a double dose of blood pressure medication.
One study conducted by the University of Chicago involved 50 individuals who had both high blood pressure and spinal misalignments in their neck area. After just one chiropractic treatment session which involved specialized adjustment of the C-1 vertebra, the individuals involved in the study had dramatically dropped blood pressures which stayed at these lower rates for as many as eight weeks. The researchers further noted that this “decrease was equal to taking two blood-pressure drugs at once.” The study points out some DCs feel so strongly about the positive effects of treating this one particular vertebra that they have limited their practice to just this portion of the spine.
Another study found similar positive blood pressure results and was published in the March 2015 edition of the Journal of Chiropractic Medicine. In this case, 20 individuals were studied to determine what effect upper and lower cervical spinal manipulation had on their blood pressure and heart rate. After engaging in upper cervical spinal manipulation therapy, the researchers reported that the participants had lower systolic blood pressures. They also reported experiencing less pain upon conclusion of the treatment sessions.

Helping patients gain control

In some cases, people need medication to help control their blood pressure but, as you can see, chiropractic may also help keep it at lower and safer levels. Additionally, to help your patients get their blood pressure to healthier levels, the Mayo Clinic provides other suggestions for lowering blood pressure without using medication which include:

  • Losing weight if they weigh more than is healthy for their frame
  • Increasing their level of physical activity, aiming for at least one-half hour of exercise per day on average
  • Consuming a diet full of heart-healthy foods such as fruits, veggies, whole grains, and low-fat dairy
  • Decreasing salt intake by choosing foods lower in sodium, putting the salt shaker away, and limiting the amount of processed foods they consume
  • Drinking no more than one alcoholic beverage a day, or two drinks a day if they are a man under the age of 65
  • Stop smoking
  • Reducing the amount of caffeine they drink
  • Cutting their stress levels
  • The sooner they get their blood pressure under control, the better it is for their heart in both the short and long-term.

Read the original article: HERE

Save the Date! We’re getting healthy together!

WG Bootcamp
Tuesday Jan.12 @ 6pm
12 week meet up with like minded individuals for a semi-private Dr supervised workout and nutrition bootcamp. We will be hosting food learning classes & a variety of workouts 2-3 times per week for optimum results. Looking for interest..can only accept 6-10 people. Goals are the fuel in the furnace of achievement…find out to to finally be healthier & stronger for life…designed to give you the tools to live a healthier lifestyle even after the 12 weeks.

RSVP -please call if interested by 1/12/16
508.339.1418, ask for Rebecca
12 week bootcamp includes:
-Nutritional counseling with pre & post body composition studies
-Specific meal plans for you (depending on weight / health concerns, test results, etc)
-3 food and nutrition breakout sessions @ wicked good chiropractic
-Fitness assessment with Pace Fitness
-2-3 workouts per week @ PACE Fitness with Jeff Fortier
-Daily Support &motivation online via private groups & email

stay healthy

DECEMBER 2, 2015 BY WICKED GOOD WELLNESS GROUP
http://www.chirothinweightloss.com/blog/entry/quick-and-easy-meals-on-the-chirothin-plan

stay healthyStudies have shown that the more often you cook at home, the more successful your weight loss plan will be. However, busy schedules often eat into cooking time and derail your good intentions. Quick and easy meals can keep you on track with your very low calorie diet (VLCD). Below are some tasty suggestions for meals that are quick, easy and flavorful.
Please remember that the amount of protein allowed during the “Losing Phase” is 3.5 to 4 ounces and adjust recipes accordingly. In the maintenance phase no more than 8 ounces of protein a day should be consumed. All recipes below serve four, but the portions can be adjusted for the phase you are currently on.

Shrimp with Tomatoes and Cauliflower Rice
Vegetable broth as needed
1 small onion, chopped
1 28-ounce can diced tomatoes, drained
Salt and pepper
1 pound medium shrimp, peeled and deveined
Instructions
Add 2 to 3 tablespoons of vegetable broth to a large saucepan on medium-high heat. Add the onion and cook, stirring occasionally, for 4 minutes. Let the onions brown a bit, but add more vegetable broth if needed to keep them from burning. Add the tomatoes, salt, and pepper, then simmer, stirring occasionally for about 4 to 6 minutes. Add the shrimp and cover. Simmer until shrimp are cooked through, 3 to 5 minutes. Serve with the cauliflower rice.

Cauliflower Rice
1 head cauliflower, any size
Instructions
Cut the cauliflower into large chunks and place in a food processor. Pulse carefully until the cauliflower is completely broken down. (Pull out any unprocessed pieces.) Heat a large, nonstick frying pan on medium heat and add the raw cauliflower rice. Cook for 5 minutes stirring constantly until tender, a little browning is fine. Remove from heat and serve. Each 1 cup serving of cauliflower rice equals 2 servings of vegetables.
Note: The raw cauliflower rice can also be frozen for up to 3 months for later use. Thaw on the counter for a few minutes before using in a salad or cooking as described above.

Lemon Chicken and Zucchini
Vegetable broth
4 boneless, skinless chicken breasts
½ teaspoon kosher salt
½ teaspoon black pepper
3 small zucchini, thinly sliced
1 clove garlic, thinly sliced
1 lemon
Instructions
Heat the oven to 400°F. Season the chicken with ¼ teaspoon each of the salt and pepper. Place chicken in large baking pan, roast in oven for 12 minutes. In a large skillet over medium heat, heat 2 tablespoons vegetable broth, and add the zucchini, garlic, and remaining salt and pepper and cook until tender, about 3 minutes. Add to the baking pan with chicken, squeeze lemon over top and toss.

Lemon Fish with Asparagus
1 lb. asparagus
4 frozen of fresh fish filets, such as haddock or halibut, ½ to 1 inch thick
12 cherry tomatoes
2 green onions
Fresh lemon juice or sliced lemons
Instructions
Preheat oven to 425F (220C). Place four large pieces of foil or parchment paper on counter. These will become your bundles. Divide asparagus evenly between each bundle. Place one frozen or fresh fillet in center of each piece of foil. Slice tomatoes in half. Arrange tomatoes around fish. Coarsely chop the onions and scatter over tomatoes and fish. Squeeze lemon juice or arrange lemon slices overtop. Bring edges of foil together. Fold over and seal tightly to form a bundle. Place bundles, seam side up, on a rimmed baking sheet. Bake in center of preheated oven until a knife tip inserted in center of fish comes out warm, 15 to 25 minutes, depending on thickness of fish. Serve with ½ cup with cauliflower rice.

Grilled Steak with Cauliflower Mashed Potatoes
1 teaspoon garlic powder
1 teaspoon thyme
¼ teaspoon salt
¼ teaspoon pepper
1 pound sirloin steak or strip steak, trimmed and cut into 4 portions
Instructions
Preheat grill to medium. Sprinkle both sides of steak with garlic powder, thyme, salt, and pepper. Place the steak on the grill, grill for 4 minutes per side for medium rare, 5 minutes per side for medium. Let the steak rest for 5 minutes. Serve steak with cauliflower mashed potatoes. (Recipe below.)

Cauliflower Mashed Potatoes
2 heads of fresh cauliflower
8 cups of vegetable broth
2 heads of fresh garlic
1 bundle of green onions
Salt and pepper to taste
Instructions
Wash and cube the cauliflower into one inch squares. Add the chunks of cauliflower and vegetable broth to a large stock pot. Peel the garlic cloves and add to pot. Add chopped green onion to pot. Bring all ingredients to a boil for 20-25 minutes until cauliflower is tender.
Pour into colander. Use a potato masher in the colander to squeeze out as much liquid as possible. Mash the cauliflower, garlic, onion mixture to desired texture. Or if you prefer, you can use a blender or stand mixer to get the desired consistency. Add salt and pepper for taste. Use in place of mashed potatoes.

Spiced Pork Chops with Haricots Verts (French Green Beans)
¾ teaspoon ground chipotle chile pepper
½ teaspoon salt
½ teaspoon garlic powder
½ teaspoon ground coriander
¼ teaspoon black pepper
4 (4-ounce) boneless center-cut lean pork loin chops, trimmed
To prepare pork, heat a nonstick grill pan over medium-high heat. Combine chipotle, salt, garlic powder, ground coriander, and black pepper and sprinkle over pork. Add pork to pan; cook 4 minutes on each side or until done.
Slender haricots verts are an elegant and quick-cooking complement to any meal. Heat a large nonstick skillet over medium-high heat. Add 12 ounces haricots to pan; cook 3 minutes, stirring occasionally. Stir in ¼ teaspoon salt, black pepper to taste, and 2 thinly sliced garlic cloves; cook 5 minutes or until garlic is lightly browned.
To make preparation for these or any meals easier, you can take some time over the weekend to prepare cauliflower rice and freeze for future use. Whenever you are chopping vegetables, onions or garlic, chop extra and keep in the refrigerator for easy access. Keep vegetable broth on hand, either homemade or your favorite brand. With a little planning and preparation, you’ll soon be preparing quick and easy meals that will keep your diet on track.

Dr. Sarah Corcoran
Wicked Good Chiropractic
154 Copeland Drive
Mansfield, MA 02048
(508) 339-1418
Chiropractic ~ Massage ~ Nutrition